In the course of 2011 silver clay prices have almost doubled, though silver as such showed rather stable price dynamics. The shops put the blame on the high yen exchange rate, but I guess that precious metal clay has just become too popular.
I found this development quite disappointing. I love making metal clay hollow forms, combining them with (semi)precious stones. But in order to stay proportionate to the stone an animal figure would often consume 25-30 grams of clay (with the value of USD 50 or more).
Cost cutting has always been the best driver for creativity, especially when dealing with precious metals. Actually most jewellery pieces featuring objects such as animals, birds, plants etc are hollow. Silver clay makes a wonderful material for hollow shapes. The technique is quite simple: a silver clay shell is built around a core of a combustible material, such as paper, bread crumb or cork clay. During firing the core burns out leaving the fine silver shell.
 So I decided to apply this technique – in modified form – to my own creations. The easiest way would have been using cork clay for the “dummy”. But cork clay is relatively pricey too. The pieces of pressed papier-mâché turned out to be well-recyclable and suitable for the purpose. They were cut with scissors, then glued together with a simple paper glue which burns without releasing too many chemical compounds.
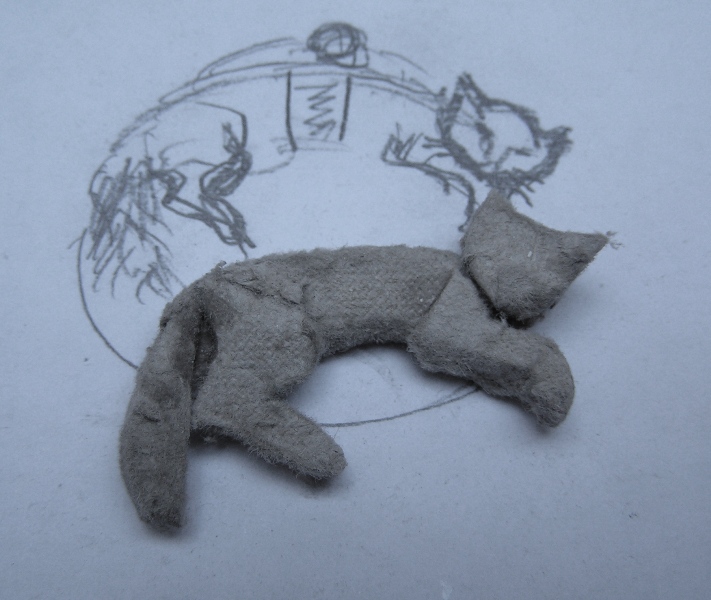
 When the dummy was filed to shape, I rolled out a 3 card thick flap of silver clay and pulled it over the dummy. First I tried the 5 card thick flap but it turned out to be too thick. 3 cards were just fine to reveal all the details of the core shape.
It is essential that the flap remains equally thick and whole, especially at the edges. The edges need extra attention. They need to be solid and smooth since they will determine the shape after firing and since they will contact the skin. But it’s quite difficult to make them perfect when they lie so close to the paper. All the filing and reinforcing has to be done from the outside, while the best way would be to work from within.

I spent much more time building up the edges than carving and polishing the front. If the dummy is fine, very little needs to be done to the front. Just shaping the muzzle of the cat and texturizing the fur (if it has to be a furry cat). Here the cat is finished and ready for firing.

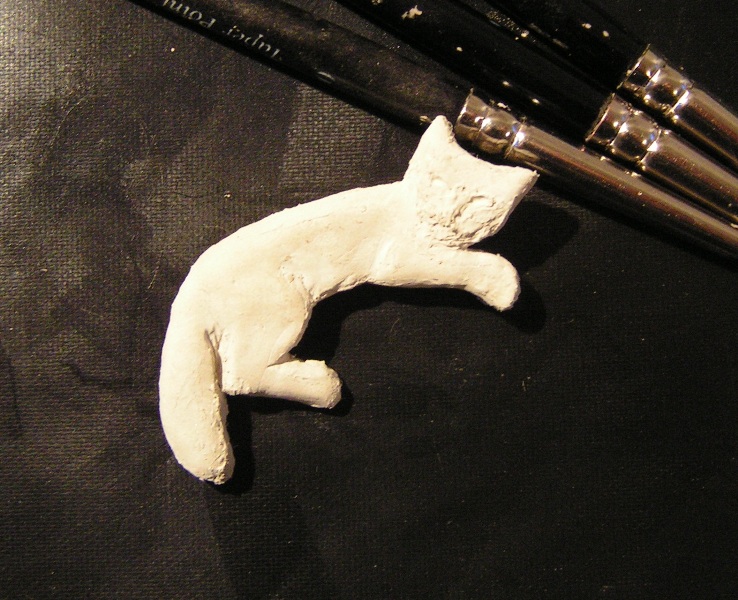
The firing (1 hour at 800C) was OK, the papier-mâché burned out for 80%, so some ash still remained and had to be removed. The shape was perfectly hollow and yet strong. However I noticed a small crack on the inside. After repairing it with Art Clay Silver Oil Paste, the piece was refired – again for 1 hr at 800 degrees. I stuffed the cat with some firing wool to prevent it from sagging during the firing, but it was just a precaution since most hollow shapes do not sag during the second and subsequent firings.

After the second firing the kitty looked great and felt very light and firm at the same time. Then the usual procedure was followed: soldering, polishing, setting the stone, high-polishing. And here is the result: the ultimate light edition of a 4 cm large cat figure, which took less than 10 grams of silver clay to make.
I am very happy with this experiment since it allows me to make king-size figures with very little material. An extra advantage is that such figures are made from one piece, so they are quite strong as compared to the ‘assembled’ sculptures. I’m going to experiment more with different core materials to get finer detail.
Leave a Reply