PMC processing step I: shaping
Shaping wet clay
It is as easy as making cookies. The same principle: dough rolled out on a sheet of non-sticky paper (such as teflon) with a roller.
You can improvise with plastic pipe as a roller. It is important that the roller is smooth, dirt and dust-free and that both the roller and the paper are oiled so that clay does not stick. I use old olive oil for that.
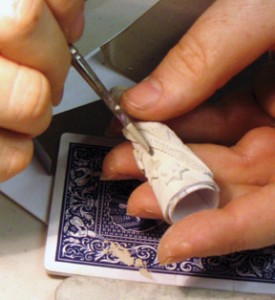
The traditional way to roll the clay to the required thickness is the “playing cards method”. Take 3 to 6 cards and put them under the roller on both sides. Three cards are the minimum. For pieces with texture five and even six cards are better. After the “dough” has been rolled out it can be further processed: cut, stamped, pressed in a mold etc.
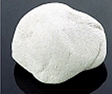
I remember the feeling when I opened my first pack of precious metal clay. It was quite exciting, even stressful, to work with costly material that is literally drying in your hands. To reduce this stress I really recommend practicing with other types of fast-drying water based clays before you start working with much more expensive precious metal clay.
After some time I learned that pmc processing does not need to be stressful. There is practically nothing that can go irreversibly wrong with metal clay (until it is fired). If the piece fails from the first attempt, just collect the clay, knead it and start all over again. However there is a limit to how many times you can do it. After third kneading clay starts to dry showing cracky and corny structure. Then it is time to “revitalize” it by feeding it with moisture. Take a lump, pierce it several times with a needle, spray some water, wrap it in plastic and let it rest for some time. Warning: the moisturized clay is sticky, so knead it without removing the plastic wrap.
 For shaping of wet clay you may need special rubber tipped clay shapers, clay knives etc. But the most important tools are a brush and a cup with water. Water should be clean (some say – distilled, but I think our Dutch tap water is clean enough). Since clay particles coming off from the brush will end up in the water, don’t throw out the baby (clay sediment) with the bath water. Collect it, for instance in an empty skin cream pot with a lid. One day you can add it to your “recycle pot” (see below).
If the piece is OK, let it dry – at least for 24 hours – before further processing. If your clay is of a ‘slow dry’ type you may even need longer time. You can always speed up the process by drying pieces with a hairdryer or in the kiln (at max 90°C).
Dry “greenware” processing
The PMC guild uses the following rule of a thumb for pmc processing: 10-80-10. It means that both wet clay shaping and the processing of the piece after firing should account for 10% of the time each. Eighty percent of the time should be spent processing dry clay, aka “greenware”. Dry clay pieces can be assembled together, as well as filed, sanded and polished. Dry clay processing produces the main bulk of “waste” in the form of sawdust, grains, little clay pieces etc. All this waste is too costly to be wasted. Collect it all in a “recycle pot” (a skin cream pot made from glass would do fine). Then add some water to it and you will have your own clay paste which can be used for different purposes, like adding or “gluing” two pieces together. The finer the waste – like sawdust – the easier it mixes with water into a clay paste. You may want to grind larger waste pieces in a designated pepper mill to make them better soluble in water.
The sawdust from filing is relatively clean and well recyclable. On the other hand grains from (some kinds of) sanding paper can contaminate clay. So maybe it is not such a bad idea to separate ‘clean’ waste (from filing) from ‘contaminated’ waste (from sanding). Also let your pieces dry well before filing and sanding: otherwise your files will be clogged with wet sawdust in a minute.
When sanding you start with sandpaper grit 200 – and end up with grit 6000. At this last stage silver shine appears on the dry clay. This is the shiny promise of a future silver jewellery piece.
For further details about polishing and shaping please read my blog.
Adding, cutting off, mending broken pieces
Pmc processing allows enormous freedom: everything can be added, cut off, bent, manipulated in every possible way. If something breaks – no problem, just fix the broken contact. Larger parts are better separated in the beginning, when the clay is still wet and the remains can easily be re-integrated into the wet clay. Waste from dry clay processing can be perfectly recycled as well (see above).
Adding up elements to dry clay can be very exciting. You may use water, your own clay paste or commercial pmc paste as adhesive. The latter holds best because it contains special adhesive additives. But your own clay paste can be as good. When building something up, do it in layers: apply a layer of clay, then let it dry, then apply another layer etc.
Bending.
Bending is actually best done while the clay is still wet. If it dried up, make it wet, spray some water on it, cover it with plastic wrap and let it absorb water for a while. You can feel when the piece is wet enough to be bent without cracking. To make the piece round in a controlled way just let it rest for a while on a rounded surface. Any rounded surface would do: from tea cups to plastic pipes.
There is one interesting thing I noticed about curves. We know that pmc shrinks after firing with a percentage between 15 and 30%. The curves shrink too: the open “C” curves become more open, the closed “O” curves become more closed. It is quite tricky to calculate it in advance if you want to set a stone.
PMC processing step II: firing
Kiln – the alchemist’s dream
 Firing is essential part of the pmc processing. This is the stage when alchemy happens: a piece of dirt becomes precious metal. Technically it means that the binder burns out leaving sintered metal particles. The end product should be pure 999-silver (and, in case of other brands – silver or other metal with corresponding content). If the fired piece contains anything else but metal then it is simply “underfired”.
The optimal firing temperature is 900 degrees Celsius. The optimal firing time is 2 hours. These were the absolute requirements for the first generation of silver clay – PMC standard. Later pmc generations do not require that high for that long: 600°C for 30 minutes will suffice with PMC3. And still for the best result use the golden (or should it be callled ‘silver’?) standard of 900°/ 2 hrs.
My opinion might be different from the mainstream. In every silver clay manual you will read “kiln-firing or torch-firing”. I don’t believe in torch firing. It is virtually impossible to keep the same temperature throughout the whole piece for 10 minutes or more. Without any measurements, the only measuring device being you eyes. Gazing at red metal for such a long time is quite a strain on your eyes. And holding the torch for such a long time is a strain on your hands. I made my point here.
I just set up the right time and temperature programme on my Paragon kiln and it does its job perfectly. I am very happy with this piece of equipment. This is the alchemist’s dream come true.
PMC processing step III: after firing
Soldering
Soldering of precious metal clay is a bit different form soldering sterling silver.
Patina
Silver can be made black – oxidized – for an “aged” effect. The traditional chemical for that is the “liver of sulphur” or LOS. You just dissolve a drop of LOS in water, put the container on a stove, warm it up, dip the silver piece in it… then take it out and rinse it off with water. To avoid chemical interaction use plastic tweezers to grab the silver piece.
What is less known is that black is the ultimate patina colour. Before becoming black the LOS patina passes through the following colours: yellow, pink, g reen, blue, grey – and at the end – black. The crucial factors here are the temperature and the time – of exposure to LOS. By adding a drop of liquid ammoniac tp the LOS solution this “rainbow” effect is enhanced.
The LOS patina is not very durable. It can be easily removed: mechanically or chemically.
There are so many other things to tell about pmc processing. Most of them come with the experience. Please read my blog to share in my experience of pmc processing.
And here are some of my favourite pmc processing ONLINE FREE resources:
PMC download sheets from “down under”
Precious metal clay techniques