Delft sand casting: choose the right model
In my previous blogs part I and part II I have described (in Dutch) my basic experiences with Delft sand casting technique. This technique uses oily read sand stuffed inside two aluminum rings. You can make molds of different shapes in this sand and then pour the melted metal into it. This blog is about sharing a more advanced experience with sand casting. It is not meant to be a manual ( which can be found here ).
The shape
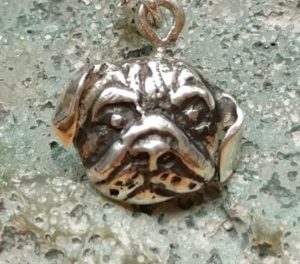
One of the basic limitations of the Delft sand casting technique is that it does not work for every shape. The basic shape must be conic: the upper part should not be wider than the lower part. There must be no protruding details which get stuck in the sand when you separate the rings from each other. Another limitation is that the shape must be as compact to the center as possible. The center is where the casting channel is located. The more peripheral branches in the model, the higher the chance that the melted metal would not reach them (see troubleshooter paragraph below). Flat shapes, like this one pug face to the right, are Okay, but also deep conic shapes are fine. You need to follow the flow of the melted metal to understand the logic.
The material
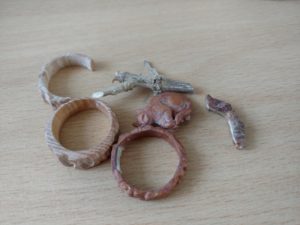
Not only the shape but also the material of the model is important. For the nature-inspired jewelry makers, every natural object looks like a perfect model. However, twigs and branches are too flexible to make a good model. I experimented with covering them with varnish and glue to make them stiffer. Unfortunately, glue covers their texture and sometimes the sand gets stuck too.
Some jewelry makers prefer carving models from wood and hard cardboard. It is a very labor-intensive process. Fortunately, the model can be reused.
Since I started my jewelry making adventure with precious metal clay I like sculpting models in clay. But here comes the challenge. Gypsum-bonded investment materials are often too fragile. The model won’t survive stamping and hammering into the sand and can break.
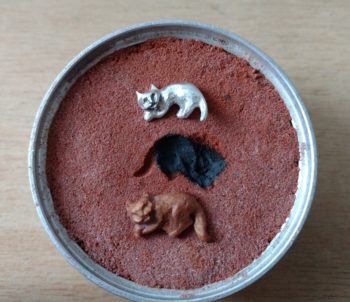
Polymer clay is an easy, available, cheap and strong material. However, it is quite difficult to make a refined model. The look remains ‘clayish’. At least with my technique, I can not make it as fine as my silver clay objects. You can see it in my items below. They are quite unsophisticated.
I also experimented with bee’s wax but found this material difficult to process. The wax melted in my fingers. And when it hardened, it was still not hard enough.
Hard stone and metal objects make great models which can also survive being stamped into the sand. Actually, you can use any cheap metal (like brass) prefabs to ‘upgrade’ the objects to silver and even gold.
Delft sand casting troubleshooter: what to do if the casting is incomplete?
The first moment when things can go wrong is when the model is removed from the sand. Some fine details can get stuck in the sand. Very often the mold can be fixed manually. The missing elements such as lines etc can be restored, i.e. drawn in the sand with a needle, a burnisher or another tool. Take care that you won’t make the model thicker. Because every extra space in the mold means extra volume on the object.
But the biggest disappointment is incomplete casting. When some details of the piece are missing after the casting. You can actually already see it during the casting. The steam must escape from all vent openings. If it does not it means that the metal did not reach this particular section. It cooled off on its way, or the vent was clogged. Like this kitty to the right. In the picture, you can see that the tail section did not turn black. It means there was no silver in it. No problem, the tail has been fused manually later and soldered to the cat. The cat had to be refined anyway because the original model from polymer clay was too rough.
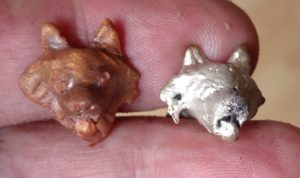
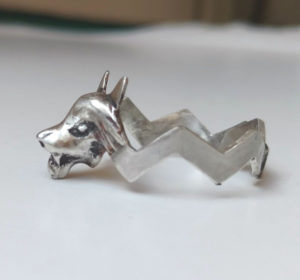
The wolf was not cast completely either. The ears were less pointy, many fine details got lost. You can also see that the surface of the silver has small blemishes. The reason is that recycled silver has been used. Very often such silver is contaminated with small dust particles. When they burn air bubbles appear in the metal. So you need to polish these blemishes off anyway. I have done a lot of sawing, carving and polishing to get this wolf ring in shape. For instance, his ears must be made thinner, his fangs – visible. The silver sawdust has been collected and will be recycled.
So if the casting is not complete, there is always the last chance: to do it again. There is no limitation of how many times silver can be re-cast. It might be even better because every time the metal is melted it gets purer. The foreign particles burn off, the crystallic structure gets more regular. You can compare it to shaking a cocktail. The more it is shaken, the more homogenous it becomes.
And you gain experience every time you cast. In the beginning, I needed assistance: someone holding my torch while I was casting with two hands. Now I hold the torch in one hand (left) and cast with the other (right). It is actually even easier because I can direct the flame better and coordinate the moment when the metal is liquid.
So in the future, my casts will become more fine-detailed and more sophisticated. But certainly, in the beginnnig, it is nice to choose a model which is 100% Delft sand casting-proof.
Leave a Reply